MyQuest®
Click one of the categories below, or use Search by keyword (above), to find answers to frequently asked questions.
Yes, you can continue to use the MyQuest® for patients mobile app. Versions of the app are available for both Apple® and Android™ devices.
We also offer a mobile device view which you can access with your mobile device's browser via the same address (MyQuest.QuestDiagnostics.com) that you use on your computer.
When you have your Quest Diagnostics® lab test results sent directly to your MyQuest Account, you can use MyQuest® on any web-enabled device (computer, tablet, phablet, or phone) to access your lab test results wherever you may be. Additionally, you can schedule appointments, use the Quest AI Companion for help understanding your results, and in some cases, purchase testing.
Yes. You can securely view MyQuest® lab test results in the Apple® Health app on Apple® iPhones® running iOS 11.3 or later. Visit the Apple® Health App support page for information on adding Quest Diagnostics® to your health records.
In addition to providing a convenient way to view your lab test results, your MyQuest Account provides you with access to many different Quest Diagnostics® services such as appointment scheduling and online billing.
Use the following steps to create a MyQuest® account:
1 Go to MyQuest.QuestDiagnostics.com and then click Create a MyQuest account.
2 On the Tell us about you page, complete all required fields and then click Next.
|
Note: Your personal information is used to verify your identity and match you to your results. |
3 On the Communication preferences page, select the check boxes next to Email and/or Text to indicate your notification preference, and then click Next.
4 On the Review your information page, check your information and preferences to verify they're correct.
|
Note: If you need to make a change, click |
5 Click Create account.
6 Check the email account that you signed up with and open the Verification code for your Quest Diagnostics account email (from [email protected]).
If you don't see it, it might be in your spam folder.
7 On the Activate account page, enter the 6 digit code from your email in the Verification code box and click Continue.
|
Note: If your code expired, click Resend code to get another email and code. |
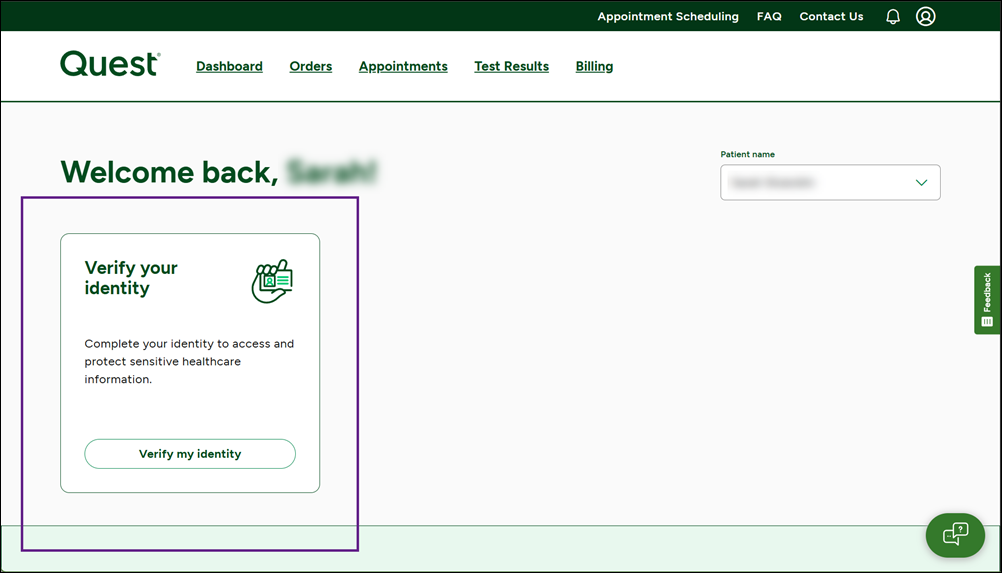
8 In your MyQuest account, click the Verify your identity box to start the verification process.
|
Note: You won't be able to view your results in MyQuest until your identity is verified. |
9 Follow the onscreen instructions.
10 When the Identity Verification Successful! message appears, click Return to MyQuest.
Congratulations! You have successfully created a MyQuest account and verified your identity. If you had lab tests done at Quest Diagnostics® within the last year, those results will show in MyQuest within 24 hours. For any new tests, check the In progress section of the Test Results tab to see the estimated delivery date(s) for your results.
|
Note: The estimated delivery date may change. If it does, you'll see a We're experiencing a process delay message at the bottom of the delayed test in the In progress section of the Test Results tab, with additional information on getting your results. |
Go ahead and start creating a new account. If the personal and contact information you enter is a match to an account we have on file, an account recovery page will display with a partial email address for the account. For example, if an email address associated with an account is [email protected], you would see A.*****[email protected]. If you think this was your account, based on what you can see of the email address, you can click the Recover button and receive an email (at the indicated email address) with your MyQuest® account username. If you don't think this is your account, continue creating a new account.
Quest Diagnostics® uses identity verification to verify the identity of an individual in order to grant a patient appropriate access to healthcare records in a situation where they are not physically present. This is a necessary step in protecting sensitive healthcare information online. The identity verification technology Quest uses verifies that a patient is a real person and that the patient is also who they say they are.
If you choose not to verify your identity, you will continue to have access to your MyQuest® account, but you will not be able to view or receive results in your account until your identity is verified. Once your identity is verified, you will not need to verify your identity again unless your personal information and/or contact information changes (name, address, phone number, or email address).
To protect your privacy and the integrity of your health record within MyQuest, Quest Diagnostics may use one or more of the following methods to verify your identity:
• Two-factor authentication (2FA). 2FA is a security method that requires 2 forms of identification, such as a password and a code texted to a mobile phone. When you registered for a MyQuest account, you set up a username and password. This password is the first method of identification. The second method of identification is a code that will be sent to the mobile phone number associated with your MyQuest account. 2FA is provided by Incode Technologies, Inc.
Requirements:
• A mobile phone number associated with your MyQuest account.
• A mobile phone with text messaging
• Document verification, facial recognition, and liveliness check. These security methods verify that your government-issued identification is real and then check your self-portrait (selfie) to make sure it is real (not a photograph) and then compare your selfie to your government issued ID. When these security methods are used together for identity verification it is called biometric identity verification (or biometric processing). Biometric processing services are provided by Incode Technologies.
Requirements:
• A mobile device (phone or tablet) with internet access and a camera
• A government-issued ID. This can be a driver's license, state ID, resident card, passport, or visa
Notes:
• Quest uses Incode Technologies, a third-party vendor, for patient ID verification
• Quest doesn't receive any photos of you or your ID
• The details you provide will be deleted 30 days after you're verified
• Quest does not share any protected health information (PHI) with identity verification services
If you are unable to complete the online identity verification process, you can
• Verify your identity at a patient service center the next time you come in to have a sample collected
• Reach out to a MyQuest® customer support representative using our Message Quest form
You will receive an email asking you to confirm your MyQuest® account. Just click the link and a screen will appear stating that your account has been confirmed. Next, sign into MyQuest and verify your identity.
First, check your spam filter—it may be preventing the email from reaching your inbox. If you still have not received the email, please use the Quest Assistant to contact us. We will need to know the email address you used to create the account and the approximate date and time when you completed the registration process.
Once your identity is confirmed, results will start appearing in your account within 24 hours, but it may take up to a full week for your MyQuest® account to populate with results for all of your tests that were performed within the last year.
If you recently visited a patient service center, had your sample collected at your doctor's office, or had your sample collected at home, check the Test Results page to see the estimated delivery date(s) for your lab results. Tests that are still being processed are marked with In progress.
|
Note: Estimated delivery dates may change. If it does, you'll see a We're experiencing a process delay message at the bottom of the delayed test. The message will also provide additional information on getting your results. |
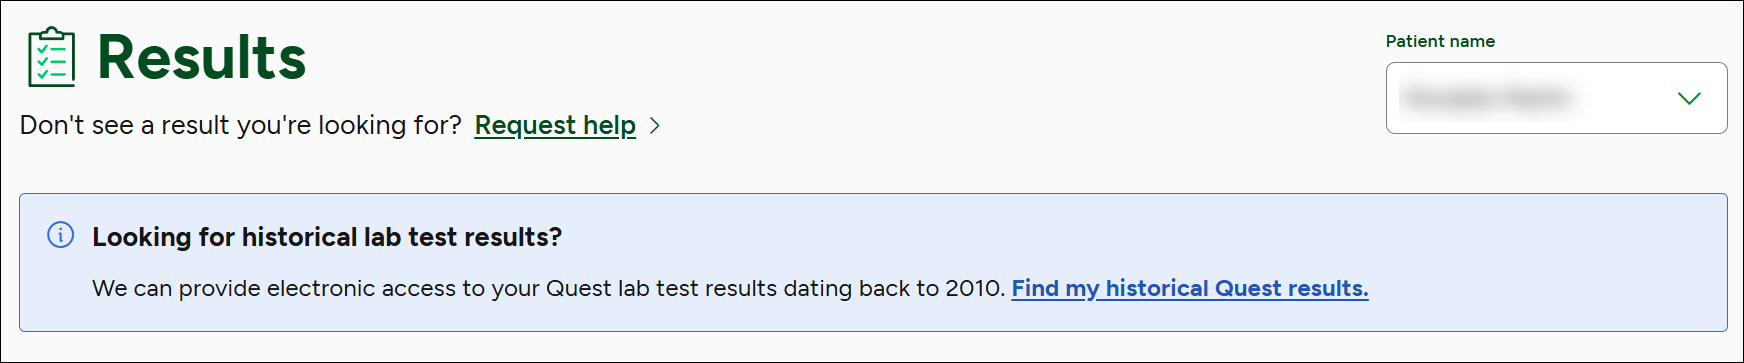
If you don’t see tests from your lab order within approximately a week of sample collection, go to your Test Results page. Next to Don't see a result you're looking for?, click Request help.
Next, follow the instructions to request your lab results.
|
Note: If your account didn't automatically import your entire test results history, you will see the following message:
To have those older results (dating back to January 1, 2010) imported, click Find my historical Quest results. If you don't see this option, your account is up to date and you don't have any additional electronic lab results. |
Certain historical lab test results may not be available in electronic format in MyQuest. If you need to obtain a printed lab test result, you can submit a written request using the Patient Request to Access or to Disclose Protected Health Information (PHI) (Access Form) in English or Spanish.
Patient access forms can be submitted as follows:
Mail: Quest Diagnostics
9601 Renner Blvd
Lenexa, Kansas 66219
ATTN: Clinical Client Services
Fax: 1.855.854.9151
Email: [email protected] [not recommended if unencrypted]
Yes, we implement industry best practices, such as secure HTTPS encryption, to protect your information. We require a username and password to access your information and after 30 minutes of inactivity, you are automatically logged out. Our servers comply with all regulatory rules associated with protecting health information.
At this time, the only health information you can include for your family are lab test results. You can receive lab test results for verified loved ones and family members who are part of your circle.
There is no limit to the number of lab test results that can be saved in your account.
Minors ages 13 to 17 can create a MyQuest Account, access MyQuest®, and if identity verification is completed, receive lab test results.
If you want to receive lab results by mail, fax, or email, you can submit a written request using any patient access form. If you need a form, you can download a PDF copy of the Patient Request to Access or to Disclose Protected Health Information (PHI) (Access Form) in English or Spanish.
Patient access forms can be submitted as follows:
Mail: Quest Diagnostics
9601 Renner Blvd
Lenexa, Kansas 66219
ATTN: Clinical Client Services
Fax: 1.855.854.9151
Email: [email protected] [not recommended if unencrypted]
We wanted to let you know that you can have your Quest Diagnostics® test results sent directly to a free MyQuest® account. You can view your results in MyQuest on any web-enabled device (computer, tablet, phablet, or phone) wherever you may be. Additionally, you can schedule appointments, and in some cases, purchase testing.
The doctor who ordered your lab tests will be provided with a copy of the results. You can contact your doctor for your results and you can also review your results in your MyQuest® account.
When you see an error message, that means we cannot find a data match for you. The account creation process will take a bit longer because we will be unable to automatically populate personal information and contact information fields with your information. You will have to type it in.
Use the following steps to retrieve your username:
1 Click Log in, and when you are on the Sign In page, click Forgot Username (located under the Sign In button).
2 Type the first name, last name, email address, and date of birth associated with your account.
3 Click Continue.
You will be sent an email from [email protected] that contains your username.
4 Go to your email (the one that is associated with your account) and look for the email from [email protected] with the subject of Forgot Username Email. If you don't see it, check your spam folder.
5 If you have forgotten your password, continue with
Use the following steps to reset your password:
1 Click Log in, and when you are on the Sign In page, click Reset Password (located under the Sign In button).
2 On the Password Reset page, type your username.
3 Click Continue.
4 If you have both an email address and a mobile phone entered on your MyQuest account, select if you would like to reset your password by text message or email and click Continue.
5 Depending on if you used email or text, do the following:
• Email: In your email associated with your MyQuest® account, look for the email from [email protected] (if you don't see it, check your spam folder)
• Text: Check your text messages for a message from 34492 with a verification code from Quest Diagnostics Authentication Service
6 Type the verification code within 15 minutes and click Continue.
|
Note: If your code expired, click Resend code to get another. Verify you're entering the most recent code. |
7 Type your new password, and then type it again to confirm.
Passwords are case-sensitive, must be 8-22 characters in length, and contain at least 1 letter and 1 number or special character.
8 Click Continue.
9 On the Your password has been reset page, click Back to Sign In.
10 On the Sign In page, enter your username and new password to log in.
Multi-factor authentication (MFA) provides an additional level of protection for your MyQuest® account. When MFA is enabled, you will receive and enter a verification code after entering your regular login credentials. You can choose to receive the verification code by text message, email, or both. You will be prompted for an MFA code each time you sign in.
Complete the following steps to enable MFA on your MyQuest account:
1 Sign in to MyQuest.
2 Click the person ( ) icon > Account settings, and click Profile.
3 Check that your phone number and email address are up-to-date.
|
Note: If your phone number or email address need to be updated, click |
4 Click the person () icon > Account settings, and click on the Sign in and security section.
5 Next to Protect your account, click Continue.
6 If prompted, re-enter your password and click Submit.
7 Read the explanation of MFA, and then click Continue to enable MFA.
8 On the window that follows, select the method you’ll use to receive your MFA code during login. Options include:
• Both text message (primary) and email (secondary)
• Text message only
• Email only
|
Note: Text messaging requires a mobile phone. |
9 When prompted, confirm your mobile phone number or email address based on the method(s) you selected, and click Submit.
A verification code is sent to your mobile device or email address.
10 When prompted, enter the verification code and click Submit.
11 If you selected both text message and email, repeat steps 8 and 9 to enter and verify your email address.
12 When the setup process is complete, click Next to return to MyQuest.
When you sign in to MyQuest after enabling MFA, a verification code is automatically sent to you. Type the code in the Verification code box and click Sign in.
Complete the following steps to disable MFA on your MyQuest account:
1 Sign in to MyQuest.
2 Click the person () icon > Account settings, and click Sign in and security.
3 Next to Protect your account, click Continue.
4 If prompted, re-enter your password and click Submit.
5 On the Configure multi-factor authentication (MFA) page, click Disable MFA.
6 On the Continue disabling MFA? pop-up, click Continue.
MFA is disabled and you are returned to the MyQuest dashboard.
You can update your email address on the Account settings page.
|
Note: To keep your account secure, you'll need to verify your identity again after changing your email address. You won't be able to see your test results until you re-verify your identity. |
1 Click the person () icon > Account settings.
2 Click Profile.
3 Next to Personal information, click the pencil (![]() ) icon.
) icon.
4 Enter your new email address in the Email box.
5 Click Save Changes.
You can update your name on the Account settings page.
|
Note: To keep your account secure, you'll need to verify your identity again after changing your name. You won't be able to see your test results until you re-verify your identity. |
1 Click the person () icon > Account settings.
2 Click Profile.
3 Next to Personal information, click the pencil (![]() ) icon.
) icon.
4 Enter your new name in the First name and/or Last name box.
5 Click Save Changes.
You can update your address on the Account settings page.
|
Note: To keep your account secure, you'll need to verify your identity again after changing your address. You won't be able to see your test results until you re-verify your identity. Before updating your address in MyQuest, make sure your doctor's office has your new address on file (so Quest can match your test results to your MyQuest account). Also, update the address on your US government-issued photo ID, as you may need to show that ID during identity verification. |
1 Click the person () icon > Account settings.
2 Click Profile.
3 Next to Personal information, click the pencil (![]() ) icon.
) icon.
4 Enter your new address.
5 Click Save Changes.
You can change your password on the Account settings page. Passwords are case-sensitive and cannot be the same as your Username.
1 Click the person () icon > Account settings.
2 Click Sign in and security.
3 In the Password section, click Update.
4 On the Change Your Password page, enter your Current Password and then your New Password twice.
|
Note: Passwords are case-sensitive, must be 8-22 characters in length, and must contain at least 1 letter and 1 number or special character. |
5 Click Save Changes.
You can update your insurance on the Account settings page.
1 Click the person () icon > Account settings.
2 Click Insurance.
3 Next to Primary insurance (or Secondary insurance), click the pencil (![]() ) icon.
) icon.
4 Enter the information that has changed.
5 Click Save Changes.
You can update your communication preferences on the Account settings page.
1 Click the person () icon > Account settings.
2 Click Communication preferences.
3 On the Manage preferences page, verify that your Email (and optionally Text (mobile)) information is up to date.
4 In the Quest updates section, under Insights and promotions, check Email.
5 Click Save Changes.
You can update your communication preferences on the Account settings page.
1 Click the person () icon > Account settings.
2 Click Communication preferences.
3 On the Manage preferences page, in the Quest updates section, under Insights and promotions, uncheck Email.
4 Click Save Changes.
|
Note: It can take up to 10 days for Quest to stop sending you email updates. |
Here are a few things to consider before deactivating your account:
• What happens when you deactivate your account? When you deactivate, you will immediately lose access to:
• Your lab results
• Messages in your MyQuest® account
• Your My Circle members (caregiver and dependent accounts)
• The Genetic Insights dashboard
• Access to questhealth.com, if you use the same credentials to log in to that site
• Data sharing with connected accounts (eg, Apple® Health)
• What if I want an account in the future? You'll be treated as a new account holder. For privacy reasons, if you've changed personal information (such as your name or address), we won't be able to automatically match you with historic lab results. Your account will contain only the notifications and lab results from orders that match your current personal information
• Before you deactivate your account. View your Quest accounts accessed with MyQuest credentials (MyQuest, questhealth.com, Genetics Insights dashboard) and save what's important to you. In MyQuest, you can email, fax, or print your lab results. You can print messages on the Inbox and Sent tabs and download any of their attachments. Review the FAQs in each service for additional help in saving important information
Complete the following steps to deactivate your MyQuest account:
1 Click the person () icon > Account settings.
2 Click Sign in and security.
3 In the Account deactivation section, click Deactivate.
4 Read the information, and if you agree, click Continue.
Your account is deactivated and you'll receive a confirmation email.
If you don't want access to your MyQuest® lab test results in your Apple® Health app (or any other third-party app), you can update your connected devices on the Account settings page.
1 Click the person () icon > Account settings.
2 Click Authorized devices.
3 Find the device you want to disconnect from MyQuest and click Remove.
4 On the pop-up, click Remove.
5 Your Authorized devices page is updated to show the device was removed.
Having personal information such as your name, phone number, email address, and date of birth lets us hold your appointment for you. We may use your email address or phone number to provide you with information such as confirmation of your appointment, reminder notifications, or notification if a Quest Patient Service Center has an unplanned closure. Also, the state of NJ may request additional personal information for public health reporting.
Each state has its own reporting requirements, and Quest may be required by law to send your results, including personal information you have provided, to a state department of health for public health reporting. For more information about how we use your information please see our Privacy page.
We have added an optional gender identity question to be more inclusive. Additionally, if gender identity is provided, it may enable faster results. Sharing personal information such as gender identity is up to you, and you have the option to select Choose not to disclose for this question.
No. Sharing personal information such as gender identity is up to you; you also have the option to select Choose not to disclose for this question.
My Circle keeps you updated on your family’s health through shared access to Quest appointments and lab test results. It's an important tool for caregivers and parents. Once you have access to your loved one's lab test results, you can stay updated on your family’s health and support them in making healthy decisions.
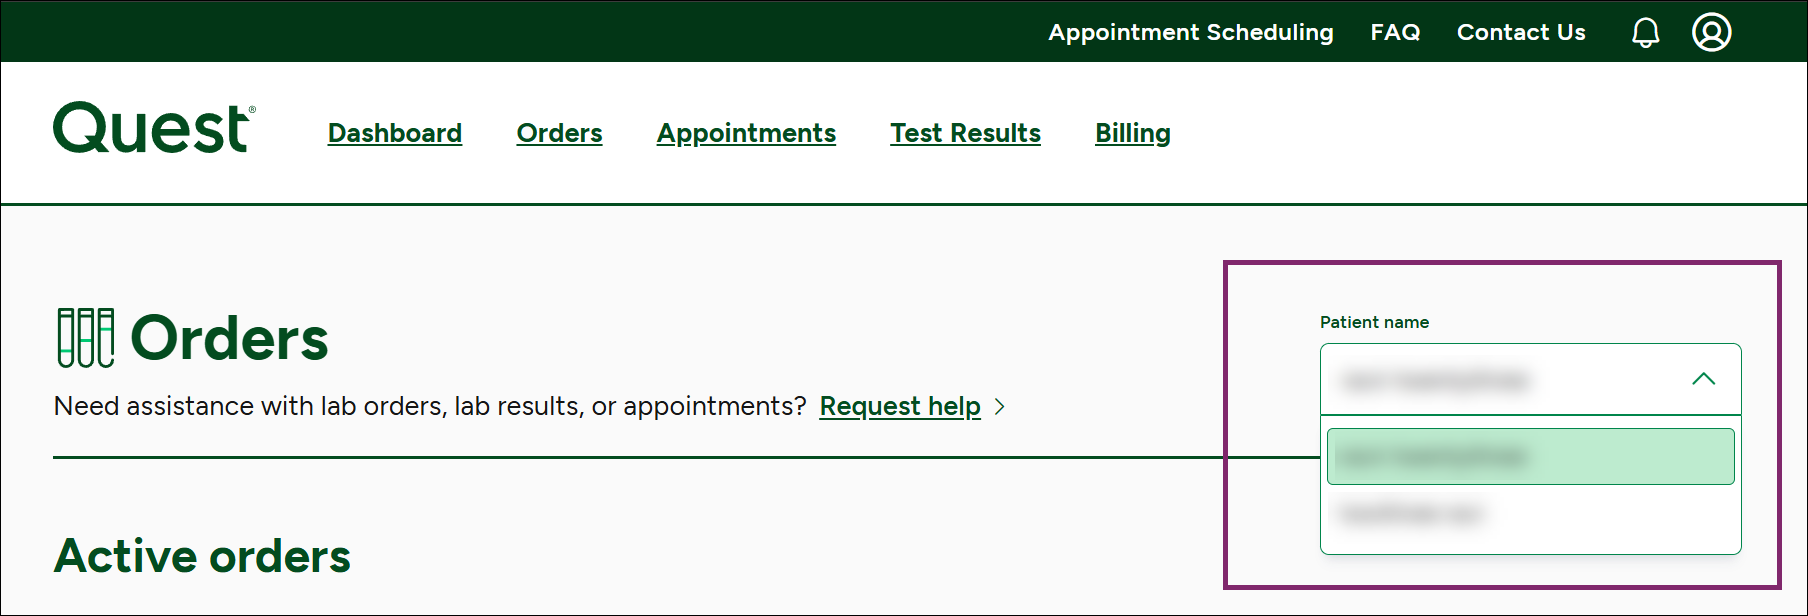
After you've added someone to your circle, use the Patient name dropdown on each page to switch between your health information, and theirs:
Your circle is composed of those for whom you are a caregiver. Your circle helps you stay updated on their health and lets you support them in making health-related decisions. Others can also add you to their circle (and be a caretaker for you, with your permission).
There are 2 types of MyCircle connections. These relationships are defined as follows:
• Caregivers: Two people, both over 18, who are both registered MyQuest® users. You can either request to be someone else's caregiver or register someone to be your caregiver.
• Dependent/Sub-Account: This is an account you create and maintain for another person, such as a child or incapacitated adult. The dependent's health information is linked to your account, and can only be accessed by you when you sign in to your MyQuest account.
You can receive your dependent's lab test results after you verify your own identity and also your relationship with the dependent. To be identified as a verified personal representative for an adult dependent, you must provide legal documentation (eg, a birth certificate, court documents, power of attorney, a health proxy). For a child dependent, you must attest that you are the parent or legal guardian; you do not need to provide any legal documentation.
|
Note: Once you have verified your relationship, you may not receive certain sensitive lab test results (eg, pregnancy, drugs of abuse, or STIs [sexually transmitted infections]). Additionally, some states have laws that prohibit releasing a minor's sensitive lab test results to an authorized personal representative. Users under 18 cannot create a dependent account. |
You have to register someone as your caregiver and then select the information that you would like to share with them.
|
Note: The person who will be your caregiver must be at least 18 years old, have a MyQuest® account, and tell you their MyQuest username. |
1 Click the person () icon > Account settings.
2 Click MyCircle.
3 On the Manage MyCircle page, click Add a family member.
4 In the Register someone as your caregiver section, click Register caregiver.
5 On the Register someone as your caregiver page, enter their first name, last name, and MyQuest username.
6 Select what they can see:
• Test results: Check this box if you want your caregiver to see your Quest test results
• Health record messages: Check this box if you want your caregiver to see messages you sent to and received from your doctor, if you used MyQuest when that feature was available
7 Click Save caregiver.
MyQuest emails your caregiver (on your behalf) to ask them to confirm your request. When they accept, you'll be added to their MyCircle page.
There are 2 different ways to become someone else's caregiver:
• You can be a caregiver for someone over 18 who already has a MyQuest® account (or wants to create one). For this type of connection, you send them a request asking to be their caregiver (see below).
• The second type of caregiver is one who creates a dependent/sub-account for a child or adult dependent. To be a caregiver in this relationship, you must be a verified personal representative for the dependent. To be identified as a verified personal representative for an adult dependent, you must provide legal documentation (eg, a birth certificate, court documents, power of attorney, a health proxy). For a child dependent, you must attest that you are the parent or legal guardian; you do not need to provide any legal documentation. In this situation, you'll create their MyQuest account (see below).
|
Note: You have to be 18 or older to be someone's caregiver or create a dependent/sub-account. |
You'll need to know this person's full name and email address.
1 Sign in to your MyQuest account.
2 Click the person () icon > Account settings.
3 Click MyCircle.
4 On the Manage MyCircle page, click Add a family member.
5 On the Select how to grow your circle page, in the Request to be someone else's caregiver section, click Send request.
6 Enter their first name, last name, and the email address they use for their MyQuest account.
7 Click Send request.
Quest sends an email on your behalf with your request for caregiver access.
• If the person already has a MyQuest account, they click the link in the email to accept your request to be a caregiver
• If they don't have a MyQuest account, they can create a MyQuest account using a link in the email and then accept your caregiver request
Once the person accepts, they appear in your circle.
The dependent/sub-account will be linked to your account, and can only be accessed when you sign in to your MyQuest account.
|
Note: If you update your personal information or email address in the future, you'll need to re-verify your identity. Until you do so, you won't be able to view your dependent's results (or your own). |
1 Sign in to your MyQuest account.
2 Click the person () icon > Account settings.
3 Click MyCircle.
4 On the Manage MyCircle page, click Add a family member.
5 On the Select how to grow your circle page, in the Create a dependent account section, select Parent or legal guardian of a minor.
6 Click Create sub-account.
7 On the Dependent information page, type their information and click Next.
8 On the Terms page, review the terms and click I agree.
9 On the Attestation page, in the Your relationship to patient box, select the choice that describes your relationship.
10 Check the box below certifying that you are the parent or legal guardian.
11 Click I agree.
12 On the Success page, click Dismiss to return to the MyCircle settings page.
The dependent/sub-account will be linked to your account, and can only be accessed when you sign in to your MyQuest account.
|
Note: You'll need to upload an electronic copy of legal documentation that verifies your status as a personal representative. Files must be 5 MB or less in size and in .png, .jpg, or .pdf format. |
1 Sign in to your MyQuest account.
2 Click the person () icon > Account settings.
3 Click MyCircle.
4 On the Manage MyCircle page, click Add a family member.
5 On the Select how to grow your circle page, in the Create a dependent account section, select Legal guardian of adult.
6 On the Dependent information page, type their information and click Next.
7 On the Terms page, review the terms and click I agree.
8 On the Legal Documentation page, in the Your relationship to patient box, select the appropriate type of relationship.
9 In the Upload files section, drag your electronic copy(ies) of the legal documents that name you as the personal representative into the gray area to attach them.
Alternately, click Select files to locate them on your device, and click Open to attach them.

10 Click I agree.
11 On the Success page, click Dismiss. You'll now see your dependent's name in My Circle with a status of In Review.
Approximately 2 business days after your documentation is uploaded, you'll receive an email telling you if your request is approved or denied. If your request is approved, In Review changes to Authorized Access. You'll be able to see your dependent's Quest information. If you are denied, the email will tell you why.
You can remove your caregiver, and then you will be automatically removed from their circle. This can be done from the Managing Your Circle section on the Account settings page.
Use the following steps to remove a caregiver.
1 Sign in to your MyQuest account.
2 Click the person () icon > Account settings.
3 Click MyCircle.
4 Click Remove to the right of your caregiver's name.
5 On the Confirmation pop-up, click Remove.
They are removed from your MyCircle page, and you are removed from their circle.
You can manage your circle from the Account settings page. Use the following steps to remove someone from your circle.
1 Sign in to your MyQuest account.
2 Click the person () icon > Account settings.
3 Click MyCircle.
4 Click Remove to the right of the person's name.
5 On the Confirmation pop-up, click Remove.
They are removed from your MyCircle page, and you are removed from their circle.
It depends on your relationship. Refer to applicable relationship type for an answer:
• A Caregiver Relationship. If someone in your circle has provided you with access to their lab test results, you will be able to view them in My Circle. If you cannot view lab test results, then you need to speak with your family member or loved one and ask them if they are willing to share them. If someone in your circle does want to share lab test results, they will need to access their MyQuest® account and update the list of information that they share with you to include lab test results.
• A Dependent/Sub-Account relationship. If you have created a dependent/sub-account for another person and have either attested, or provided proof, that you are a verified personal representative for that person, you should have access to their lab test results and be able to view them in My Circle.
If you are a parent, unless you revoke your status, you will be a verified personal representative until your child reaches the age of majority for the state in which the child resides. Otherwise, you will be a verified personal representative for your adult dependents until the date your legal documentation indicates that you no longer have the authority to make legal decisions on your dependent's behalf.
Caution! If you make any changes to your personal information or email address, your identity will become unverified. Until you re-verify your identity you will not be able to view or receive results for yourself or your dependents.
At this time there is no way to transfer a dependent/sub-account to a MyQuest user. You can print, fax, or email any information in the dependent/sub-account.
It depends on your relationship. Refer to applicable relationship type for an answer:
• A Caregiver Relationship. Yes, MyQuest will send an email as follows:
• If you are the caregiver, then the email will notify the recipient of your care that you have removed them from your circle, and that you will no longer have access to their health information.
• If you are the person who is the recipient of care, then your caretaker will be notified that their caregiver privileges have been revoked and you will be automatically removed from their (your caretaker's) circle. Additionally, this person will no longer have access to any of your health information.
• A Dependent/Sub-Account relationship. As a personal representative who maintains a dependent/sub-account, only you can remove yourself as a caregiver. If you revoke your verified personal representative status, you will no longer receive your dependent's lab test results and if you remove your dependent from your circle, you will delete any and all of your dependent's information (including lab test results).
Sign in to your MyQuest account. On the Dashboard, Orders, Appointments, and Test Results pages, use the Patient name box to choose whose information you want to see:
Your caregiver can print, fax, or send (via non-secure email) a copy of your lab test results. When this happens, you will receive an email notifying you that your lab test results were distributed.
If your caregiver has access to your lab test results, your caregiver will see the lab test results in the same format that you do. For example, if you can view a lab test result in the Interactive Insights® format, your caregiver will also see that lab test result in the Interactive Insights format.
Sometimes incomplete or out-of-date personal information gets sent with a lab test order. When this occurs, Quest Diagnostics® can't always match a lab test result to a MyQuest® account, and in such cases, we can't send a lab test result. To ensure that we can match your dependent's lab test results to your MyQuest account, do the following:
• Check with your dependent's doctor or other healthcare providers (primary care physician, specialists, Quest Diagnostics PSC, etc) to see if your dependent's personal information is current and up-to-date.
• Check your dependent's MyQuest profile to see if the information in it matches the information that their doctor or other healthcare providers have on file.
If your dependent's information is correct, then the issue may be with your account information. If you have recently changed your personal information or email address, then you may have accidentally stopped the delivery of lab test results. To continue viewing or receiving your dependent's lab test results, you must reverify your identity.
Note: You may not receive certain sensitive lab test results (for example, pregnancy, drugs of abuse, or STIs [sexually transmitted infections]) for your dependent. Some states have laws that prohibit releasing a minor's sensitive lab test results to an authorized personal representative.
The Dashboard page provides you with a scrollable list of appointments, account, and lab test information. This includes:
• Upcoming appointment information
• Estimated delivery dates for lab results
• Lab test results
• Important account messages
If you are a caregiver or parent, you can view lab test information individually for the people in your circle by selecting their name from the Patient name box in the upper right of the page.
If you have added people to your circle, use the Patient name box in the upper right of the page to select your name.
To view information for others in your circle, select their name in the Patient name box.
For more information directly related to scheduling an appointment, visit the Appointment Scheduling FAQ page.
The Appointments page displays your appointments that you scheduled while signed in to MyQuest®. If you have others in your circle, use the Patient name box on the upper right of the page to select another person's appointments.
Under the HIPAA Privacy Rule, patients, patient’s designees, and patient’s personal representatives can get a copy of a patient's lab results. Patients or personal representatives may put their request in writing and Quest Diagnostics® must provide physical copies to the patient within 30 days of the request, if not sooner.
If you sign up for a MyQuest® account and verify your identity, results will start appearing in your account within 24 hours, but it may take up to a full week for your MyQuest account to populate with results for all of your tests that were performed within the last year. And, if you recently visited a patient service center, had your sample collected at your doctor's office, or had your sample collected at home, check the In progress section of the Results page to see the estimated delivery date(s) for your lab results.
Yes. You may receive a copy of your test results and other protected health information via mail, fax or email by completing and sending a Patient Request to Access or to Disclose Protected Health Information (PHI) (Access Form) in English or Spanish. Once your completed form has been received, your test results will be delivered to you within approximately 30 days.
Patient access forms can be submitted as follows:
Mail: Quest Diagnostics
9601 Renner Blvd
Lenexa, Kansas 66219
ATTN: Clinical Client Services
Fax: 1.855.854.9151
Email: [email protected] [not recommended if unencrypted]
Yes, you can track the status of your lab tests if your identity is verified.
|
Notes: • Identity verification is completed as part of setting up your MyQuest account or after you change your personal or contact information • Some doctors request that results only be delivered after all the lab tests in the order are completed. If your doctor has made this request, you won't see the results for completed lab tests until all lab tests in that order are completed |
After you have your sample collected, you can follow your test's progress on the Results page. Click Test Results to access the Results page.
In the Recent Results section, a card shows the status of your test. While Quest is still working on your tests, the card displays In progress, with the number of results that are completed and/or pending in the Status section. Click View to see the results of your test(s).
After you have your sample collected and it's sent to the lab, your test is considered In Progress. Quest is processing your test at this time.
To see the status of your tests, click Test Results in your MyQuest account. On the Results page, in the Recent results section, one (or more, depending on how your doctor placed your order) card for your test displays:
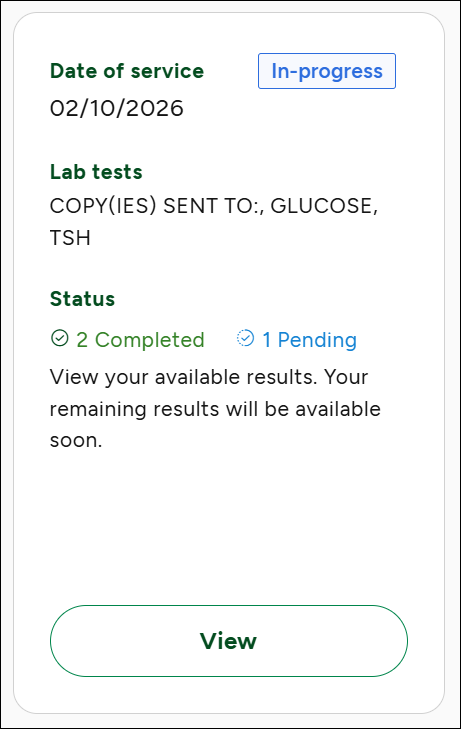
In the Status section, you can see how many tests have been completed and how many (if any) are still being processed. If available, Quest will give you an estimated date of when your tests will be completed.
When you have one or more tests that are completed, click View to see the results.
If your testing was ordered by your doctor, your lab test results (performed by a Quest Diagnostics® laboratory) will be delivered to MyQuest® as soon as they are finished. You can check the Results page to see the estimated delivery date(s) for your test results, if available.
The estimated delivery date may change. If it does, you'll see a We're experiencing a process delay message, with more information on getting your results.
If you are waiting for lab results in CA, KY, TX, or PA, your lab results may be held for a period of time before they are released. This hold time is in place to comply with state-specific laws and is included in the estimated delivery date.
|
Note: If it has been a week since your visit for testing and you don't see that test on the Test Results page, click Request help and follow the instructions. After requesting your lab test results, a new item appears on your Test Results page with information about the status of that request. |
If your testing was ordered by your doctor, you should not need to request lab test results. Lab test results (performed by a Quest Diagnostics® laboratory) will be delivered to your doctor and your MyQuest® account as soon as they are ready.
First, go to the Test Results page. If you see the Access your test results by verifying your identity message, you need to complete the identity verification process to receive your test results. This is a necessary step in protecting sensitive healthcare information online. The identity verification technology Quest uses verifies that a patient is a real person and that the patient is also who they say they are. Click the Verify my identity button to complete this process.
If you've verified your identity, in the Recent Results section a card shows the status of your test. While Quest is still working on your tests, the card displays In progress, with the number of results that are completed and/or pending in the Status section.
If either of the following applies:
• You see the You don't have any lab results yet message, or
• You do see at least one lab result in the Recent Results section but it's been a week since we collected your sample,
click Request help and follow the instructions. After requesting your lab test results, a new item appears on your Results page with information about the status of that request.
|
Note: When lab tests don't show up in MyQuest, it's often because incomplete or out-of-date personal information gets sent with a lab test order. When this occurs, Quest Diagnostics can't always match a lab test result to your MyQuest account, and then we can't send the result of that test to MyQuest. To ensure that we can match your lab test results to your MyQuest account, do the following: • Make sure your personal information in MyQuest is correct. Click the person ( • Check with your doctor (or other healthcare provider who ordered the test) to see if your personal information is current. If your information isn't up-to-date, they may have sent older information to Quest that doesn't match your information in MyQuest |
We'll notify you according to your preference for email, text message, or both. Do the following to check on your preferences:
1 Click the person () icon > Account settings.
2 Click Communication preferences.
3 On the Manage preferences page, verify that your Email (and optionally Text (mobile)) information is up-to-date.
4 In the Notifications section, under Lab results, check Email and/or Text for each notification you'd like to receive:
• Get a message when a lab order is "In progress" and each result is available: Check if you'd like to receive notifications every time a test result is ready (if you have multiple tests ordered, this will be more than 1 notification)
• Get a message when all the results from a lab order are available: Check if you'd like to receive only 1 notification, when all tests in your order are completed
5 Click Save changes.
You can also sign in to MyQuest® and check the Test Results page to see an estimated delivery date, if available.
|
Note: To see test results in MyQuest, you'll need to have completed identity verification. If you click on Test Results and you see the Access your test results by verifying your identity message, you'll need to complete that process to view any test results. Click Verify my identity to get started. |
If your testing was ordered by your doctor, your lab test results (performed by a Quest Diagnostics® laboratory) will be delivered to MyQuest® as soon as they are finished. You can check the Results page to see the estimated delivery date(s) for your test results, if available.
The estimated delivery date may change. If it does, you'll see a We're experiencing a process delay message, with more information on getting your results.
If you are waiting for lab results in CA, KY, TX, or PA, your lab results may be held for a period of time before they are released. This hold time is in place to comply with state-specific laws and is included in the estimated delivery date.
|
Note: If it has been a week since your visit for testing and you don't see that test on the Test Results page, click Request help and follow the instructions. After requesting your lab test results, a new item appears on your Test Results page with information about the status of that request. |
If you use MyCircle and someone in your circle has shared test results with you, you can view their information by clicking Patient name in the upper right of the page and selecting their name. To see your own information again, click Patient name and select your name.
If you haven't added anyone to MyCircle, only your name displays in the Patient name box.
If you use MyCircle and someone in your circle has shared test results with you, you might be viewing their information. To see your own information again, click Patient name in the upper right of the page and select your name.
If you haven't added anyone to MyCircle, only your name displays in the Patient name box, and only your information is available to view.
First, make sure you have verified your identity. Click Test Results to go to the Results page. If you see the Access your test results by verifying your identity message, you need to complete the identity verification process to receive your test results. This is a necessary step in protecting sensitive healthcare information online. The identity verification technology Quest uses verifies that a patient is a real person and that the patient is also who they say they are. Click the Verify my identity button to complete this process.
If you've verified your identity, in the Recent Results section a card shows the status of your test. While Quest is still working on your tests, the card displays In progress, with the number of results that are completed and/or pending in the Status section.
If either of the following applies:
• You see the You don't have any lab results yet message, or
• You do see at least one lab result in the Recent Results section, but it's been a week since we collected your sample,
click Request help and follow the instructions. After requesting your lab test results, a new item appears on your Results page with information about the status of that request.
|
Note: When lab tests don't show up in MyQuest, it's often because incomplete or out-of-date personal information gets sent with a lab test order. When this occurs, Quest Diagnostics can't always match a lab test result to your MyQuest account, and then we can't send the result of that test to MyQuest. To ensure that we can match your lab test results to your MyQuest account, do the following: • Make sure your personal information in MyQuest is correct. Click the person ( • Check with your doctor (or other healthcare provider who ordered the test) to see if your personal information is current. If your information isn't up to date, they may have sent older information to Quest that doesn't match your information in MyQuest |
Your lab tests and/or results may have moved, or you may need to verify your identity. Click Test Results to access the Results page.
1 Make sure your identity is verified.
If you see the Access your test results by verifying your identity message, you need to complete the identity verification process to receive your test results. This is a necessary step in protecting sensitive healthcare information online. The identity verification technology Quest uses verifies that a patient is a real person and that the patient is also who they say they are. Click the Verify my identity button to complete this process.
2 If your identity is verified, check the Recent results section.
While Quest is still working on your tests, the card displays In progress, with the number of results that are completed and/or pending in the Status section.
3 Check the Results history section to view all of your Quest test results.
4 If any of the following applies:
• You see the You don't have any lab results yet message in the Recent results section, or
• You see the You have no new test results at this time message in the Recent results section, or
• You do see at least one lab result in the Recent Results section, but it's been a week since we collected your sample,
click Request help and follow the instructions. After requesting your lab test results, a new item appears on your Results page with information about the status of that request.
|
Note: When lab tests don't show up in MyQuest, it's often because incomplete or out-of-date personal information gets sent with a lab test order. When this occurs, Quest Diagnostics can't always match a lab test result to your MyQuest account, and then we can't send the result of that test to MyQuest. To ensure that we can match your lab test results to your MyQuest account, do the following: • Make sure your personal information in MyQuest is correct. Click the person ( • Check with your doctor (or other healthcare provider who ordered the test) to see if your personal information is current. If your information isn't up to date, they may have sent older information to Quest that doesn't match your information in MyQuest |
Click Test Results to go to the Results page, and make sure you have your dependent's name selected in the Patient name box in the upper right of the Results page. Also, you may not receive certain sensitive lab test results for your dependent if that person is a minor. For example, pregnancy test results, positive results for drugs of abuse, or results for STIs [sexually transmitted infections]. Some states have laws that prohibit releasing certain sensitive lab test results for a minor, even to an authorized personal representative.
If you have your dependent's name selected in the Patient name box and the result you're looking for isn't a sensitive test, do the following:
First, make sure you have verified your identity. On the Results page, if you see the Access your test results by verifying your identity message, you need to complete the identity verification process to receive your dependent's test results. This is a necessary step in protecting sensitive healthcare information online. Click the Verify my identity button to complete this process.
If you've verified your identity in the Recent Results section, a card shows the status of your dependent's test(s). While Quest is still working on the test(s), the card displays In progress, with the number of results that are completed and/or pending in the Status section.
If either of the following applies:
• You see the You don't have any lab results yet message, or
• You do see at least one lab result in the Recent Results section, but it's been a week since we collected your dependent's sample,
click Request help and follow the instructions. After requesting the lab test results, a new item appears on the Results page with information about the status of that request.
|
Note: When lab tests don't show up in MyQuest, it's often because incomplete or out-of-date personal information gets sent with a lab test order. When this occurs, Quest Diagnostics can't always match a lab test result to your dependent's MyQuest account, and then we can't send the result of that test to MyQuest. To ensure that we can match your dependent's lab test results to your MyQuest account, do the following: • Make sure your dependent's personal information in MyQuest is correct. Click the person ( • Check with your doctor (or other healthcare provider who ordered the test) to see if your dependent's personal information is current. If their information isn't up to date, they may have sent older information to Quest that doesn't match the information in MyQuest |
No, Quest Diagnostics® will send you lab test results no matter where your sample was collected, as long as your sample was sent to Quest Diagnostics to be tested.
Lab test results performed by Quest are automatically available electronically through MyQuest®. Most people will not need to do anything to see all of their Quest test results.
To make sure you don't have any historical results (dating back to January 1, 2010), click Test Results. On the Results page, if you see the Looking for historical lab test results? notification, click Find my historical Quest results link to request them. It takes about 24 hours for those results to show in your account.
|
Note: Certain historical lab test results may not be available in electronic format in MyQuest. If you need to obtain a paper copy of a lab test result, you can submit a written request using any patient access form. You can download a PDF copy of the Patient Request to Access or to Disclose Protected Health Information (PHI) (Access Form) in English or Spanish. |
Patient access forms can be submitted as follows:
Mail: Quest Diagnostics
9601 Renner Blvd
Lenexa, Kansas 66219
ATTN: Clinical Client Services
Fax: 1.855.854.9151
Email: [email protected] [not recommended if unencrypted]
When you completed identity verification for your MyQuest® account, it populated with results for tests performed within the last year. For any new testing (after sample collection), click Test Results and check the Recent results section to see the estimated delivery date(s) for your test results.
|
Note: MyQuest doesn't provide access to pre-employment drug screening, wellness lab test results, ExamOne® results, or My Lab ReQuest™ results (Arizona residents only). |
To see if you have any older historical results (dating back to January 1, 2010), click Test Results. On the Results page, if you see the Looking for historical lab test results? notification, click the Find my historical Quest results link to request them. It takes about 24-48 hours for those results to show in your account. Most people won't need to do this, as their accounts will be up-to-date automatically.
|
Note: Certain historical lab test results may not be available in electronic format in MyQuest. If you need to obtain a paper copy of a lab test result, you can submit a written request using any patient access form. You can download a PDF copy of the Patient Request to Access or to Disclose Protected Health Information (PHI) (Access Form) in English or Spanish. Patient access forms can be submitted as follows: Mail: Quest Diagnostics ATTN: Clinical Client Services Fax: 1.855.854.9151 Email: [email protected] [not recommended if unencrypted] |
If your lab test results are available in MyQuest®, you can email, print, or fax a copy of your lab test results from within MyQuest. Otherwise, you can request that your lab test results be sent to you or anyone by mail, fax, or email.
To do this, you can submit a written request using any patient access form. If you need a form, you can download a PDF copy of the Patient Request to Access or to Disclose Protected Health Information (PHI) (Access Form) in English or Spanish.
Patient access forms can be submitted as follows:
Mail: Quest Diagnostics
9601 Renner Blvd
Lenexa, Kansas 66219
ATTN: Clinical Client Services
Fax: 1.855.854.9151
Email: [email protected] [not recommended if unencrypted]
Note: If your lab test results are not available electronically, then you must use a patient access form to get a copy of your lab test results.
You can get lab test results to your doctor in several ways:
• Download a PDF, print a copy, and hand deliver or mail it
• Fax
To print, fax, or email your doctor a copy of your lab test results using either of the following methods:
While viewing your list of lab test results on the Test Results page in the Results history section, click  next to the lab test result and then select the appropriate option:
• From the individual lab test view, click Email or Fax, and then fill in the recipient's information
• Click the Download PDF to save a copy of lab test results to your device. You can then print that PDF
|
Caution! The email you send is unencrypted (unencrypted emails are not a secure means of transfer) and can be accessed by third parties. |
You can print a lab test result while viewing your list of lab test results on the Results page or while viewing the lab test results report.
To print from the Results page:
1 Click next to the lab test result you want to print, and then select Download PDF.
The lab test result opens in Adobe Reader.
2 In the Adobe Reader toolbar, click ![]() .
.
3 In the Print dialog box, configure any additional print settings as needed and click Print.
To print while viewing your results:
1 Click ![]() and select a view option, as follows:
and select a view option, as follows:
• Simple. Use this option to only print lab results.
• Standard. Use this option to print lab results and range and over-time graphs.
• Advanced. Use this option to print lab results, range and over-time graphs, and insights.
The selected lab test result opens in Adobe Reader.
2 In the Adobe Reader toolbar, click ![]() .
.
3 In the Print dialog box, configure any additional print settings as needed and click Print.
You can delete a lab test result using either of the following methods:
• While viewing your list of lab test results on the Results page, click next to the lab test result you want to delete, and then select Delete.
• From the individual test view, click Delete.
Caution! You will be unable to recover a deleted lab test result. If you have deleted a lab test result by mistake, contact our customer service team using Quest Assistant to get the deleted lab test result repopulated.
Try each step before proceeding to the next:
1 Refresh your browser. If your lab test results are not available, go to step 2.
For the best experience, please use the latest version of Microsoft Edge™, Chrome™ for Windows or Apple® Safari®.
2 On the Test Results page, if you see the Access your test results by verifying your identity message, you need to complete the identity verification process to receive your test results. This is a necessary step in protecting sensitive healthcare information online. The identity verification technology Quest uses verifies that a patient is a real person and that the patient is also who they say they are. Click the Verify my identity button to complete this process.
Please allow a full 24 hours for all of your lab test results to be delivered to your account. If 24 hours have passed, and your lab test results have not appeared, go to step 3.
3 If you have verified your identity and after 24 hours you're still unable to see your lab test results, under Results click Request help to contact us.
Quest Diagnostics® has adopted a new, simplified format that provides you with deeper insight into your health through relevant diagnostic insights. This new format is called Interactive Insights® and enables you to view current lab test results, where lab test results fall within the test's reference range, and how lab test results trend over time. You may also see additional content relevant to the test, such as FAQs or videos, that help guide you when reviewing the lab test results. If you have any questions about your lab test results, speak with your doctor.
The reference range displayed on the trend graph may vary due to potential changes in laboratory testing methods. Please refer to the published reference range on each test report.
If your child is under 18, you can establish a dependent/sub-account for them that is linked to your account. Once you attest to your relationship, you will be able to receive their lab test results. Some states have laws that prohibit releasing a minor's sensitive lab test results to an authorized personal representative. Examples of some sensitive lab test results would include the following types of testing: pregnancy, drugs of abuse, or STIs (sexually transmitted infections).
If you want to receive lab results by mail, fax, or email, you can submit a written request using any patient access form. If you need a form, you can download a PDF copy of the Patient Request to Access or to Disclose Protected Health Information (PHI) (Access Form) in English or Spanish.
Patient access forms can be submitted as follows:
Mail: Quest Diagnostics
9601 Renner Blvd
Lenexa, Kansas 66219
ATTN: Clinical Client Services
Fax: 1.855.854.9151
Email: [email protected] [not recommended if unencrypted]
Your results will be sent to you, and Life Time, in an encrypted email within the next 2 weeks. Please contact us at [email protected] if you have any questions or if you have not received your lab test results after 2 weeks.
If you live in Arizona and used My Lab ReQuest™ to order tests, your lab test results are available only through http://www.sonoraquest.com/MyLabReQuest. Please visit My Lab ReQuest for more information on retrieving your lab test results.
Please contact us and let us help. To do this, sign in to MyQuest®, click Contact us to open the Quest Assistant, and ask why your lab test results cannot be processed.
The Quest AI Companion is an AI (artificial intelligence)-powered chatbot that, with your permission, can read and summarize your completed test results in MyQuest. It can explain the purpose of the test and tell you about trends in your results over time. You can ask the Quest AI Companion questions and get plain-language answers to help you talk to your doctor about your health.
The Quest AI Companion only has access to the last 20 completed test results in your MyQuest account, if they're less than 5 years old. Tests that are listed as still In Progress can't be read by the Quest AI Companion, but you can start another conversation with the Quest AI Companion when they're complete.
Your MyQuest account only has lab tests from Quest, so the Quest AI Companion doesn't have access to information about your medications, diagnoses, or medical procedures. You can't upload other medical information into MyQuest or send it to the Quest AI Companion.
No. The Quest AI Companion can only explain your test results. It can help you understand medical terms and reference ranges (which test numbers are considered normal). It can't diagnose you, recommend treatment, or replace talking with your doctor.
The Quest AI Companion can explain your test results in plain language, define medical terms, and explain the reference ranges used in tests. You can ask the Quest AI Companion questions (for example, Explain that again, but use simpler terms, or How have my results changed over time?).
It's a helpful tool, but it cannot diagnose, recommend treatment, or act as a substitute for talking to your doctor. Always talk to your doctor regarding your medical questions. The Quest AI Companion does not replace your doctor's expertise, judgment, or personalized knowledge of you.
The Quest AI Companion doesn't decide if your results are abnormal—it tells you if the lab determined that your results were outside the expected range. Any result outside the expected reference range simply means the value is high or low compared to the standard. If that is the case, the next step is to contact your doctor. Your doctor can tell you what your test results mean in the context of your overall health.
The Quest AI Companion is available 24 hours a day, 7 days a week, to answer your questions before a visit with your doctor.
Always talk to your doctor about your results. The Quest AI Companion provides information and has been tested, but it's not a human or a doctor and may make mistakes. The Quest AI Companion only sees your test results in your MyQuest account, whereas your doctor knows your whole health history. Only your doctor can diagnose you or suggest treatments.
Your privacy is our top priority. All sensitive personal health information (PHI) is stored using industry-standard protocols. Quest doesn't share your lab results or PHI with any advertisers, insurance companies, or outside parties.
If you use the Quest AI Companion, the following applies:
• The Quest AI Companion has access to completed results that show in your MyQuest account and your sex, gender identity, and date of birth you entered in your MyQuest account. The Quest AI Companion uses your sex, gender identity, and age to provide appropriate information about your results. We only use your test results, sex, gender identity, and age to answer the questions you ask the Quest AI Companion
To review the sex, gender identity, and date of birth you provided, in your MyQuest account click the person () icon > Account settings > Profile
• The Quest AI Companion does not have information or test results from the people you have listed in MyCircle (for example, family members, children, or caregivers)
• The Quest AI Companion is built in conjunction with Google, with strict security measures to ensure your information is protected. All data sent to the Quest AI Companion is kept separate from Google’s public AI services and is handled within Quest’s secure, HIPAA-compliant environment
• Your test results are never used to train any large language model (LLM). We only provide answers to the questions you ask, according to our strict privacy policy
• We may use your thumbs up, thumbs down, star ratings, and chat transcript to improve how the Quest AI Companion works (for example, answer length, tone, and accuracy) but not for large language model training
To protect your privacy, once you close a chat session, it can't be restarted. To save an answer from the Quest AI Companion for later use, click Copy  and then "paste" the answer to a safe place on your device.
You can rate the Quest AI Companion on each answer it sends, as well as the entire chat. To rate an answer:
• If the answer was helpful, click 
• If the answer wasn't helpful, click 
When you close the chat, you'll be asked to rate your entire chat session with the Quest AI Companion.
You can select from 1–5 stars. A 1-star choice means the chat was very bad, and a 5-star choice means the chat was excellent. If you pick 3 stars or fewer, the What can we do to improve your experience? box displays, where you can type comments:
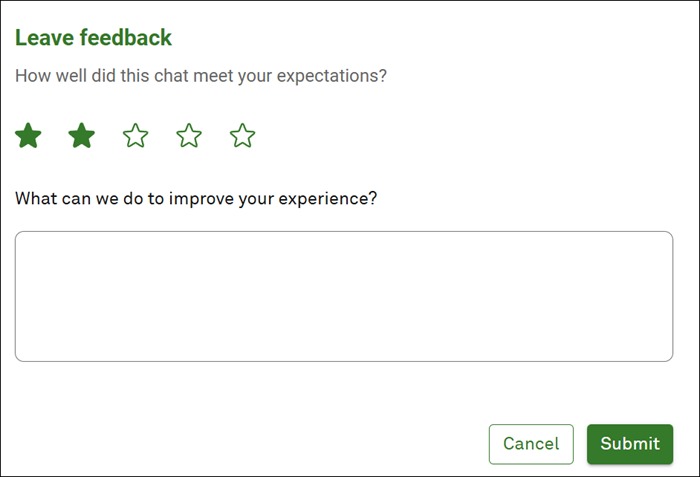
Let us know how we can improve, and click Submit.
The ability to send messages to doctors through MyQuest has been retired. As a result, only MyQuest users who have previously used this service will see a Messages page. If you have any Direct messages on your Inbox tab or Sent tab, you still have access to these messages and their attachments. However, you can no longer reply, forward, or receive any new messages.
Your messages will remain in MyQuest®. If you want a copy of a message, you can take a screenshot or use your browser's print functionality. Attachments can be downloaded to your computer by clicking on them.
Messages in your inbox with attachments have a paperclip ( ) icon next to the date. When you view the message, you will see that each individual attachment has a download (
 ) icon. To download the attachment, click the file name. If you’re using a computer, the file is automatically saved in your web browser's default download location.
You need to download a message attachment to view it. Click each file name that you want to view, or click Download All to view all of them. If you’re using a computer, the file is automatically saved in your web browser's default download location. You can then navigate to the download location and view each file.
Forgotten your username?
 Retrieve your username video tutorial
 Retrieve a forgotten username quick reference guide
Forgotten your password?
Reset your password video tutorial
Reset a forgotten password quick reference guide
Need help creating an account?
Creating a MyQuest® account quick reference guide
Need help enabling multi-factor authentication (MFA)?
Enabling multi-factor authentication quick reference guide
Need help verifying your identity to access your results?
Verify your identity quick reference guide
Need help using the Quest AI Companion?
Quest Assistant can answer many frequently asked questions about MyQuest® and Appointment Scheduling. It can even help you schedule an appointment and determine when your test results should be available. The Quest Assistant is accessible from any page by clicking Contact us at the top. Once the Quest Assistant opens, just type your question.
If you don't find the answers you are looking for in the FAQs, you can
• Access the Quest Assistant. The Quest Assistant can answer many frequently asked questions about MyQuest® and Appointment Scheduling. The Quest Assistant is accessible from the top of each page by clicking Contact us. Once the Quest Assistant opens, just type your question.
• Send us a message. You can fill out one of the following forms that sends a message directly to our customer support representatives:
• For questions about MyQuest, access the Message Quest form. While filling out this form, please specify a Reason for Contact, as it helps us get the message to the right support team.
• For questions about Appointment Scheduling, access the Appointment Scheduling Comments form.
If you need to chat with a real person, you can type "can I speak to a real person", "can I speak with a representative", or "can I speak with an agent" in Quest Assistant. Our customer service representatives are available Monday to Friday, 7 AM to 6 PM Central Standard Time (CST).
Yes. You can fill out 1 of the following forms that sends a message directly to our customer support representatives:
• For questions about MyQuest, access the Message Quest form. While filling out this form, please specify a Reason for Contact, as it helps us get the message to the right support team.
• For questions about Appointment Scheduling, access the Appointment Scheduling Comments form.